Thursday, December 4, 2014

Before Giving Away or Selling, Clean / Wipe / Erase iPhone iPad Touch iOS 8)

1. Backup device
  • via iTunes' Back Up Now button
  • via iPhone's Tap Settings > iCloud >  Backup

2. Sign out of iCloud
  • Tap Settings > iCloud
  • Scroll down
  • Sign Out

3. Erase iPhone's Content and Settings
  • Tap Settings > General > Reset > Erase All Content and Settings
  • If passcode enabled, Enter your passcode and Restrictions Passcode
  • Tap Erase iPhone
  • Tap Erase iPhone again to confirm
  • If Find My Phone enabled, Enter Apple ID password

Thursday, October 30, 2014

Create OS X Yosemite USB drive Installer

1. Download OS X Yosemite from App Store. After download, make sure "Install OS X Yosemite.app" is in the /Applications directory.

2. Insert USB (at least 8GB). No need to clean or format. Installation will format this drive. Take note of the name of the drive via Finder (under devices) or type mount from Terminal and take note of the /Volumes/name_of_usb_drive

3. Open Terminal via Applications->Terminal

4. Type the following from the command line. Replace [name_of_usb_drive] with the name of the drive from #2.

sudo /Applications/Install\ OS\ X\ Yosemite.app/Contents/Resources/createinstallmedia --volume /Volumes/[name_of_usb_drive] --applicationpath /Applications/Install\ OS\ X\ Yosemite.app --nointeraction
 
5. You will see something like the following, follow instructions and/or let it finish.

"Erasing Disk: 0%... 10%... 20%... 30%...100%... 
Copying installer files to disk... 
Copy complete. 
Making disk bootable... 
Copying boot files... 
Copy complete. 
Done."
 
6. Reboot. Press Option key during boot and choose Install OS X Yosemite drive upon boot.

Wednesday, September 10, 2014

Install Apache Cassandra on OS X


 # Requirement
Java 7 

# Download Apache Cassandra 2.0.10 from http://cassandra.apache.org/download/
wget http://www.apache.org/dyn/closer.cgi?path=/cassandra/2.0.10/apache-cassandra-2.0.10-bin.tar.gz

# Extract to e.g /usr/local; create symlink
cd /usr/local
tar -xzvf apache-cassandra-2.0.10-bin.tar.gz
ln -s apache-cassandra-2.0.10-bin.tar.gz cassandra

# Create Cassandra directories
sudo mkdir /var/lib/cassandra
sudo mkdir /var/lib/cassandra/data
sudo mkdir /var/lib/cassandra/commitlog
sudo mkdir /var/lib/cassandra/saved_caches
sudo mkdir /var/log/cassandra

# Run Cassandra
cd /usr/local/cassandra
sudo bin/cassandra -f


# Test connection; Open new terminal window
cd /usr/local/cassandra
bin/cqlsh


Saturday, September 6, 2014

Setup Sublime 3 for Web Development

# Download & Install Sublime 3
http://www.sublimetext.com/3

# Install Package Control 
# Copy to clipboard the installation script from https://sublime.wbond.net/installation

# Open Sublime 3 and open console
CTRL + ` (or View->Show Console)

# Paste the Package Control script into the console and press Enter

# Install Packages
# Open Sublime's Command Palette
CTRL + SHIFT + p (or Tools->Command Palette)

#  Select Install Package
Package Control : Install Package

# Must Haves
 SublimeCodeIntel
 SublimeLinter

# For Web Dev
 SublimeLinter-jshint SublimeLinter-json
 SublimeLinter-csslint
 SideBarEnhancements
 VCS Gutter

# For PHP
 SublimeLinter-php
 phpdoc
 phpcs
 XDebug Client

# Non-free
SFTP

Wednesday, September 3, 2014

Secure your iOS iCloud Account with 2 Factor Authentication

# Go to My Apple ID page via https://appleid.apple.com
#

# Select Manage your Apple ID
# Sign-in to you Manage your Apple ID
# Select Password and Security
# Answer your Security Questions and press Continue
# Manage Security Settings via clicking Get Started.. link
# Two-step verification page will be display then click Continue
# Click Get Started button
# Add your mobile phone to receive SMS and follow instructions
# Enter the code received from your Phone and click Verify button
# Print or print down Recovery key and keep it safe
# Enable two-step verification by checking "I understand the conditions above" and clicking the "Enable two-step Verification" button


Install PHP Profiler XHProf on Debian

# Install Prerequisites
apt-get install php5-dev graphviz php-pear

# Install XHProf
pecl config-set preferred_state beta
pecl install xhprof

# Create XHProf output directory
mkdir /tmp/xhprof
chown www-data:www-data /tmp/xhprof

# Include XHProf Alias in /etc/apache2/sites-available/default

Alias /xhprof_html /usr/share/php/xhprof_html/

   Options FollowSymLinks
   AllowOverride Alll
   Order allow, deny
   Allow from all


# Create PHP page for initializing XHProf e.g. vi /var/www/xhprof_header.php

// Init XHPROF
if (extension_loaded('xhprof')) {
    xhprof_enable(XHPROF_FLAGS_CPU + XHPROF_FLAGS_MEMORY);
    $XHPROF_ROOT = '/usr/share/php';
    include_once $XHPROF_ROOT . "/xhprof_lib/utils/xhprof_lib.php";
    include_once $XHPROF_ROOT . "/xhprof_lib/utils/xhprof_runs.php";
}

$i = 0;
while ($i < 10000) {
    $i++;
}
?>
 
# Create PHP page for de-initializing XHProf e.g. vi /var/www/xhprof_footer.php
// De-Init XHPROF, generate report and link
if (extension_loaded('xhprof')) {
    $data = xhprof_disable();
    $xhprof_runs = new XHProfRuns_Default();
    $run_id = $xhprof_runs->save_run($data, "xhprof");
    $profiler_url = sprintf('http:///xhprof_html/index.php?run=%s', $run_id);
    echo 'Profiler output';
}
?> 

# Configure XHProf via /etc/php5/apache2/php.ini
# Prepend/Append XHProf initializer/deinitializer page

[xhprof]
extension=xhprof.so
xhprof.output_dir="/tmp/xhprof"

auto_prepend_file=/var/www/xhprof_header.php
auto_append_file=/var/www/xhprof_footer.php


# Restart Apache2
service apache2 restart

Monday, August 18, 2014

Setup Apache Tomcat 8 on OS X Mavericks

# Prerequisite - Java installed
# Download Tomcat from tomcat.apache.org e.g. apache-tomcat-8.0.9.tar.gz

# Proceed to target installation directory
cd /usr/local

# Extract
tar -xzvf apache-tomcat-8.0.9.tar.gz

# Symlink shortname
ln -s apache-tomcat-8.0.9.tar.gz tomcat8

# Setup environment
vi setenv.sh

# Include CATALINA_HOME and JRE_HOME

# Add user
vi /usr/local/tomcat8/conf/tomcat-users.xml

# Include all roles (no need to create roles in the tomcat-users.xml )


# Start Tomcat
./startup.sh

# Stop Tomcat
./shutdown.sh

Sunday, August 10, 2014

JAVA_HOME Command Tool for OS X

# List installed Java
$/usr/libexec/java_home -verbose

Matching Java Virtual Machines (3):
  1.8.0_05, x86_64:  "Java SE 8" /Library/Java/JavaVirtualMachines/jdk1.8.0_05.jdk/Contents/Home
  1.6.0_65-b14-466.1, x86_64: "Java SE 6" /System/Library/Java/JavaVirtualMachines/1.6.0.jdk/Contents/Home
  1.6.0_65-b14-466.1, i386: "Java SE 6"   /System/Library/Java/JavaVirtualMachines/1.6.0.jdk/Contents/Home


# Get Current Java  Home
$/usr/libexec/java_home

/Library/Java/JavaVirtualMachines/jdk1.8.0_05.jdk/Contents/Home


# Get path to 1.6 (if installed)
$/usr/libexec/java_home v1.6

/System/Library/Java/JavaVirtualMachines/1.6.0.jdk/Contents/Home

Homebrew "brew doctor" Unexpected file Warnings / Errors

Error:

Please note that these warnings are just used to help the Homebrew maintainers
with debugging if you file an issue. If everything you use Homebrew for is
working fine: please don't worry and just ignore them. Thanks!

Warning: Unbrewed dylibs were found in /usr/local/lib.
If you didn't put them there on purpose they could cause problems when
building Homebrew formulae, and may need to be deleted.

Unexpected dylibs:
    /usr/local/lib/libmacfuse_i32.2.dylib
    /usr/local/lib/libmacfuse_i64.2.dylib
    /usr/local/lib/libosxfuse_i32.2.dylib
    /usr/local/lib/libosxfuse_i64.2.dylib

Warning: Unbrewed .la files were found in /usr/local/lib.
If you didn't put them there on purpose they could cause problems when
building Homebrew formulae, and may need to be deleted.

Unexpected .la files:
    /usr/local/lib/libosxfuse_i32.la
    /usr/local/lib/libosxfuse_i64.la

Warning: Unbrewed .pc files were found in /usr/local/lib/pkgconfig.
If you didn't put them there on purpose they could cause problems when
building Homebrew formulae, and may need to be deleted.

Unexpected .pc files:
    /usr/local/lib/pkgconfig/osxfuse.pc


Solution:
If with TrueCrypt installed, use this script to fix https://gist.github.com/trinitronx/5437061
If OSXFuse installed, remove and use Homebrew's version


Install Homebrew on OS X Mavericks

#Install Homebrew

ruby -e "$(curl -fsSL https://raw.github.com/Homebrew/homebrew/go/install)"
#Check for errors before updating
brew doctor

#Check for brew updates 
brew update


Wednesday, August 6, 2014

Install Apache 2.2 , PHP 5.4 and MySQL 5.5 on OS X using MacPorts

# APACHE
# Install Apache 2.2
sudo port install apache2

# Edit Apache2 Config
vi /opt/local/apache2/conf/httpd.conf

# Find/Edit the following
ServerName localhost:80

# PHP
Install PHP 5.4 
sudo port install php54-apache2handler

# Execute following command to include PHP5 module to Apache2
cd /opt/local/apache2/modules 
sudo /opt/local/apache2/bin/apxs -a -e -n "php5" mod_php54.so 

# MYSQL SERVER
# Install MySQL server
sudo port install mysql55-server

# Setup MySQL DB
sudo -u _mysql /opt/local/lib/mysql55/bin/mysql_install_db  

# Start MySQL
sudo port load mysql55-server

# Setup root password
/opt/local/lib/mysql55/bin/mysqladmin -u root password 'new-password'

# Stop MySQL
sudo port unload mysql55-server


Tuesday, July 22, 2014

Setup Apache & PHP for Apple OS X 10.9 Mavericks

Check installed version of Apache, open up Terminal and type

httpd -v

Start Apache, open up Terminal and type

sudo apachectl start

Stop Apache, open up Terminal and type

sudo apachectl stop

Enable PHP, open up Terminal and type

sudo vi /etc/apache2/httpd.conf

Uncomment LoadModule statement php5_module

LoadModule php5_module libexec/apache2/libphp5.so

Restart Apache, open up Terminal and Type

sudo apachectl restart


Monday, July 21, 2014

Secure Google Gmail

Google has increased its security measures to block access to Google accounts after July 15, 2014 if those accounts are being set up or synced in apps and on devices that use Basic Authentication. You may disallow less secure apps via Google's "Allow less secure apps" settings page.

https://www.google.com/settings/security/lesssecureapps


Tuesday, July 1, 2014

Friday, June 6, 2014

OS X: Partition or Resizing Error / Partition failed with the error: Couldn’t modify partition map because file system verification failed.

Shutdown

Start system into Single User Mode by holding Command+S during boot

At the command prompt, type:
/sbin/fsck -fy then ENTER

When fsck is complete, type “exit” to restart

Start system and verify disk using Disk Utility

Wednesday, June 4, 2014

Uninstall OS X EnterpriseDB PostgreSQL 9.1

Open a terminal window via Applications->Utilities->Terminal 

open /Library/PostgreSQL/9.1/uninstall-postgresql.app
sudo rm -rf /Library/PostgreSQL 
sudo rm /etc/postgres-reg.ini

Open User & Groups via System Preferences -> Users & Groups and delete PostgreSQL user

Tuesday, May 27, 2014

OS X Open Terminal at current Folder shortcut

Open System Preferences ->  Keyboard -> Shortcuts
Under Files and Folders, check New Terminal at Folder or New Terminal Tab at Folder


While at a folder, right-click, then Services, then New Terminal

Sunday, May 25, 2014

Command-line method to Compute / Generate MD5 Hash for a file

Windows
FCIV -md5 file_name

 Linux
 md5sum file_name

OS X
md5 file_name
openssl md5 file_name

Wednesday, May 21, 2014

Dual-boot Install Linux Ubuntu 14.04 LTS (Trusty Tahr) on MacBook 5,1 Aluminum Late 2008

Tested on MacBook 13-inch, Aluminum, Late 2008 on Maverick OS X and latest Ubuntu 14.04 (Trusty Tahr) LTS AMD64 + Mac Installer
NOTE:  If FileVault is enabled, turn off encryption before following the procedures below via System Preferences, Security & Privacy, Turn Off FileVault.
 
Download Ubuntu 14.04 LTS (Trusty Tahr) that support BIOS booting (+Mac version)
http://cdimage.ubuntu.com/releases/14.04/release/ubuntu-14.04-desktop-amd64+mac.iso
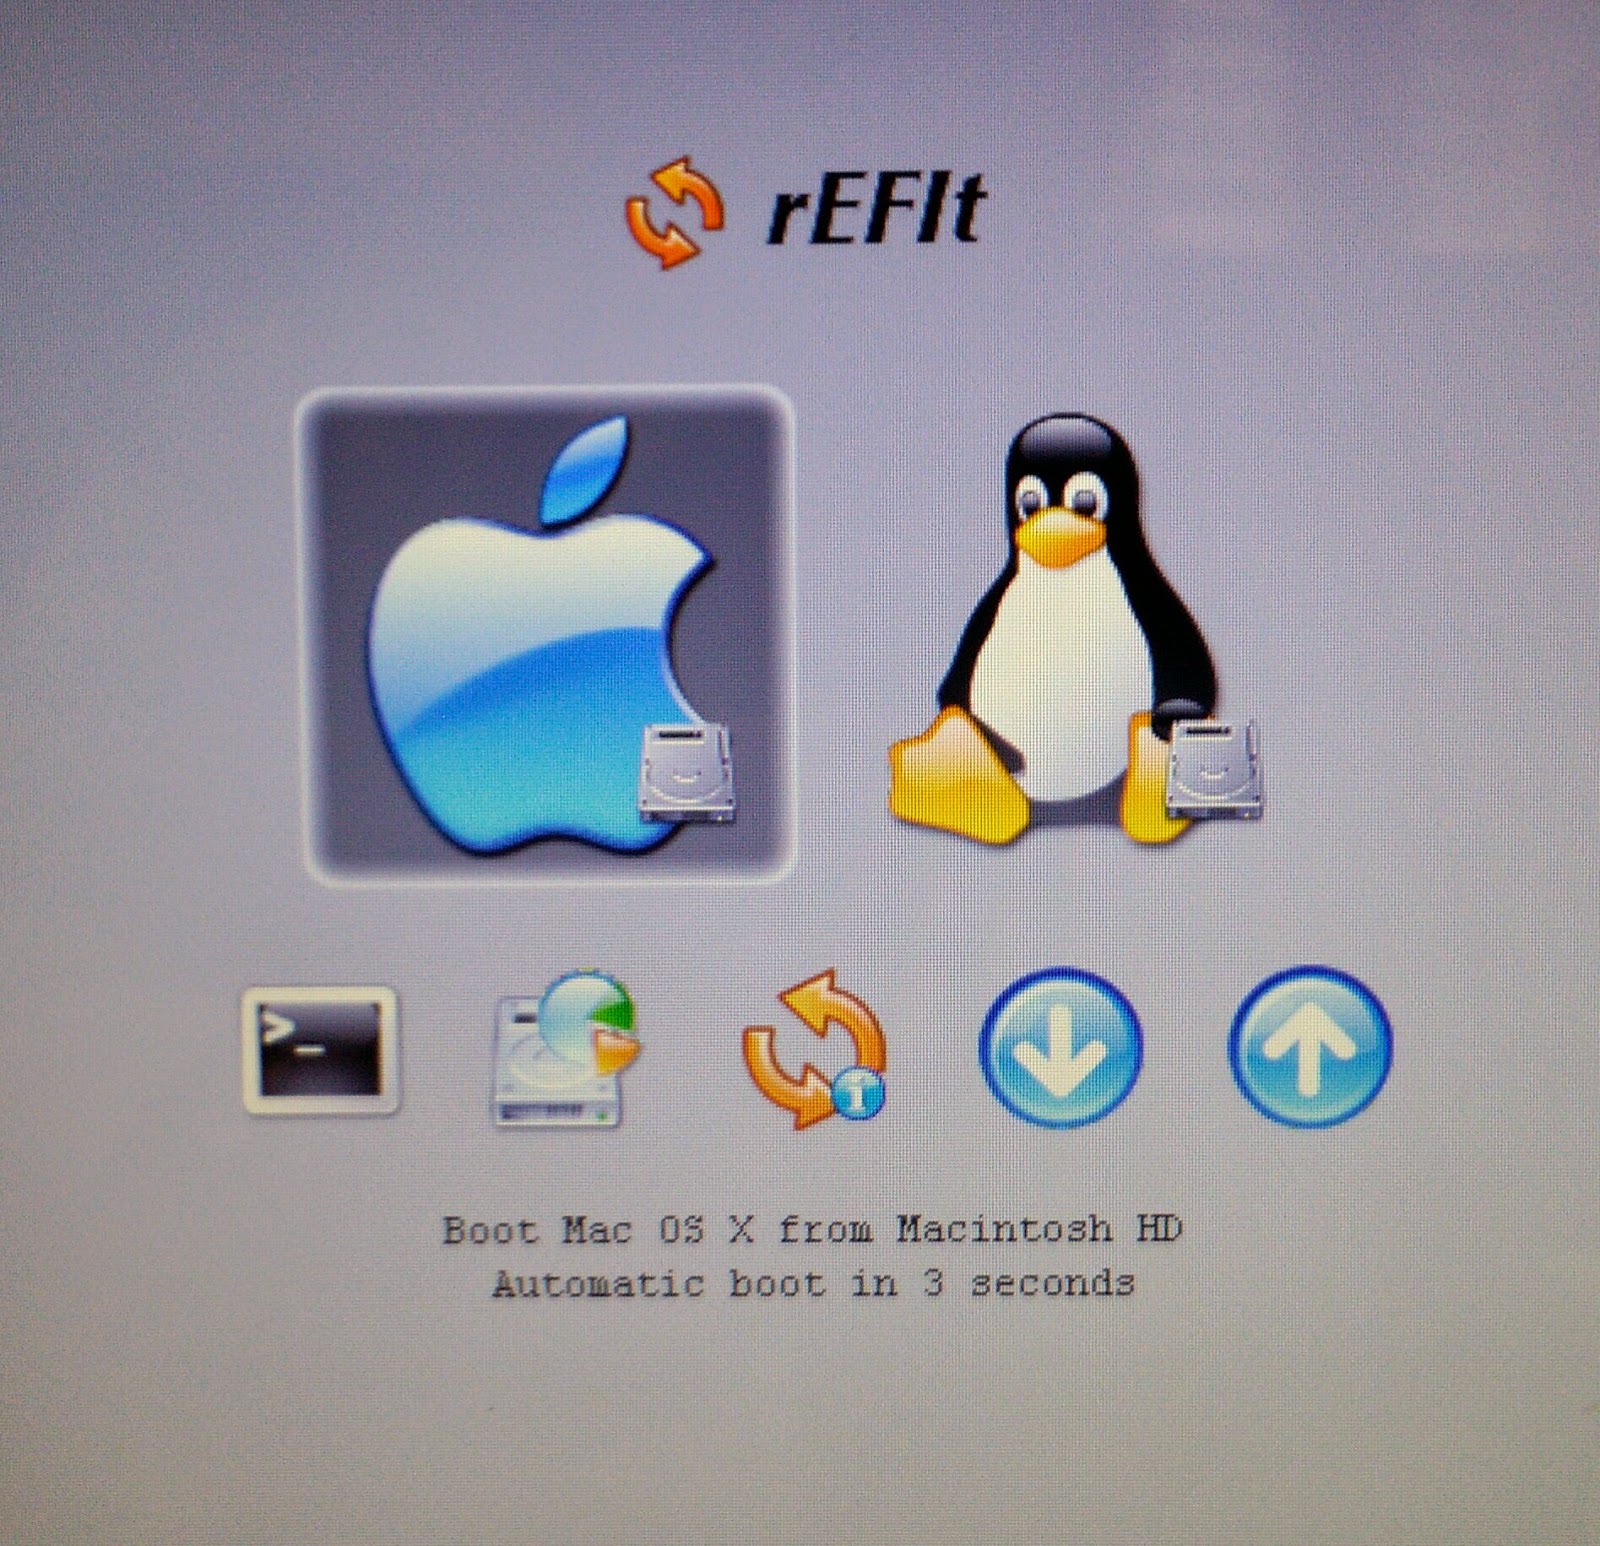
 
Download rEFIt - EFI Boot Menu and Toolkit
Website: http://refit.sourceforge.net/
Download: http://downloads.sourceforge.net/refit/rEFIt-0.14.dmg

Install rEFIt
1. Locate the downloaded file
2. Double-click the rEFIt-0.14.dmg file
3. Once extracted, install rEFIt by executing the rEFIt-0.14.mpkg file.
4. Restart machine
(rEFIt menu doesn't show up after boot, restart again and screen should show up after two reboots)
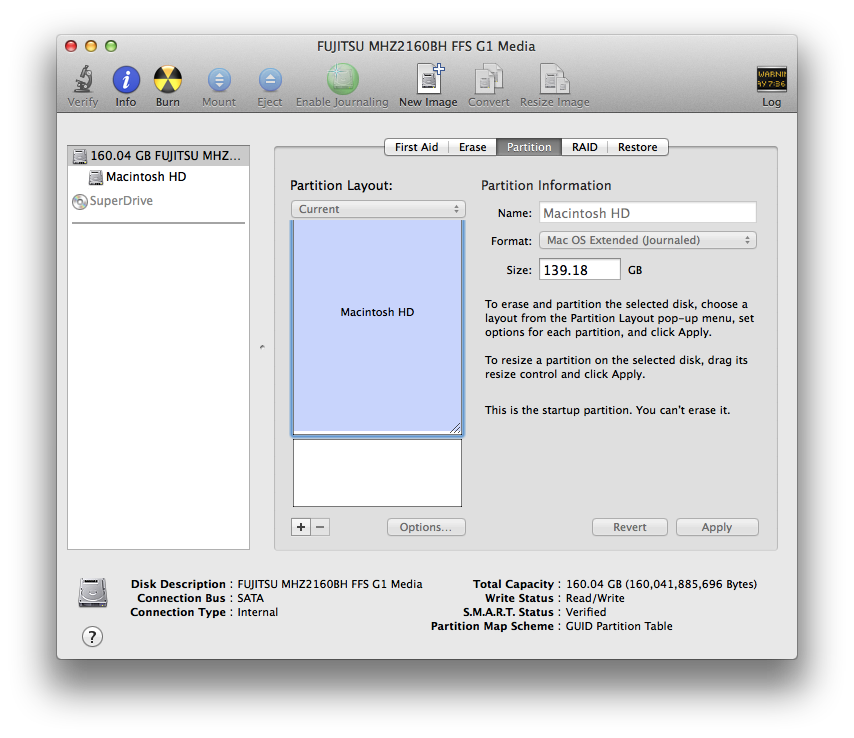

 
Using Disk Utility, add a new blank partition to be used by Ubuntu
1. Open Disk Utility
2. Select the Drive from the left-pane (e.g. 160.04 GB FUJITSU).
3. Click the Partition tab
4. In the Partition Layout click the + sign to add a new partition
5. Choose Free Space as Format
6. Modify Size for the new partition (e.g. 20 GB)
7. Click Apply, wait till finish.


Create Bootable Installer
A. Burn iso file to DVD
1. Insert blank DVD
2. Open Disk Utility
3. Drag the ubuntu-14.04-desktop-amd64+mac.iso file to left pane of Disk Utility
4. Right click the iso file then select Burn, make sure "Verify burned data" is checked
5. Click Burn.

B. Via Bootable USB
Convert downloaded Ubuntu iso to img
1. Open Terminal
2. Issue the following commands
hdiutil convert -format UDRW -o ubuntu-14.04-desktop-amd64+mac.img ubuntu-14.04-desktop-amd64+mac.iso

diskutil list  (take note of the device number e.g. /dev/disk2)

diskutil unmountDisk /dev/diskN
(replace N with the disk number from the last command)

sudo dd if=ubuntu-14.04-desktop-amd64+mac.img of=/dev/rdiskN bs=1m (replace N with the disk number from the last command)

Run diskutil eject /dev/diskN
(replace N with the disk number from the last command)

Install Ubuntu
1. Insert bootable Ubuntu Installer
2. Reboot and press letter c while booting
3. During installation, select Install Ubuntu alongside Mac OSX
(if network/internet error occurs during installation just proceed without internet connection)
Follow/continue installation
4. After installation, restart and rEFIt shows up select the Linux option

OTHERS: Install proprietary Broadcom drivers
1. Insert Ubuntu Installer

2. From Terminal, locate cd-rom where its mounted and change directory
(e.g. /media/Username/Ubuntu 14.04 LTS amd64)

3. Locate the b43 folder e.g.
cd /media/Username/Ubuntu 14.04 LTS amd64/pool/main/b/b43-fwcutter/

4. Install the b43 setup/installer
sudo dpkg -i b43-fwcutter*

5. From computer with internet access download the required firmware file copy to the MacBook either via USB
http://www.lwfinger.com/b43-firmware/broadcom-wl-5.100.138.tar.bz2

6. Extract firmware
tar xfvj broadcom-wl-5.100.138.tar.bz2

7. Install firmware
sudo b43-fwcutter -w /lib/firmware broadcom-wl-5.100.138/linux/wl_apsta.o

8. Restart
 
Ubuntu 14.04 LTS Home Screen


Sunday, May 18, 2014

Application Blocked by Security Settings (OS X)

Error:
Application Blocked by Security Settings
Your security settings have blocked an untrusted application from running.

Solution
Apple Menu->System Preferences->Select the Java icon
Java control panel will open up in a separate window. -> Select the Security Tab->Change security level to Medium. -> Accept change with Ok

Thursday, May 1, 2014

Wednesday, April 30, 2014

Full / Complete / Standalone Google Chrome Offline Installer

Standalone

http://www.google.com/chrome/eula.html?standalone=1

Multi-user

http://www.google.com/chrome/eula.html?system=true&standalone=1

Tuesday, April 29, 2014

PostgreSQL Backup and Restore

SQL Dump

pg_dump dbname > outfile 
psql -f infile postgres
 
pg_dump dbname | gzip > filename.gz
gunzip -c filename.gz | psql dbname 

pg_dump -Fc dbname > filename
pg_restore -d dbname filename 

File System Level Backup

tar -cf backup.tar /usr/local/pgsql/data

Continuous Archiving
 
archive_command = 'test ! -f /var/lib/pgsql/backup_in_progress || (test ! -f /var/lib/pgsql/archive/%f && cp %p /var/lib/pgsql/archive/%f)'
touch /var/lib/pgsql/backup_in_progress
psql -c "select pg_start_backup('hot_backup');"
tar -cf /var/lib/pgsql/backup.tar /var/lib/pgsql/data/
psql -c "select pg_stop_backup();"
rm /var/lib/pgsql/backup_in_progress
tar -rf /var/lib/pgsql/backup.tar /var/lib/pgsql/archive/
 

Monday, April 21, 2014

Eclipse : Unbound classpath container: JRE System Library [JavaSE-1.7]

Eclipse Errors:

The project cannot be buoilt until build path errors are resolved.
Unbound classpath container: 'JRE System Library [JavaSE-1.7]' in project

Resolution:

Add Java 1.7 JREs to Eclipse's JRE definitions.

Eclipse->Window->Preferences->Java->Installed JREs->Search.. Point to directory of Java

Sunday, April 6, 2014

Can't Install downloaded Distribution Provisioning Profile Xcode 5.x nothing happens

Goto Xcode->Preferences..

Select Accounts.. or Add your Developer Account if not exists.

View Details.. Provisioning Profiles should be visible already

Saturday, April 5, 2014

Unable to auto-detect email address when using Git repository for Xcode

Need to setup Git global config first.

Open Terminal

git config --global user.email "you@example.com"
git config --global user.name "Your Name"

Thursday, April 3, 2014

Direct download Xcode 5.1 without App Store

Use Safari (for resumable feature) and Download from

https://developer.apple.com/downloads/index.action#

Enable Debug Menu of AppStore

Open Terminal.

Execute the following command.

defaults write com.apple.appstore ShowDebugMenu -bool TRUE

Wednesday, April 2, 2014

Transfer/Copy diagrams from OpenOffice Draw to Impress

From Draw, select diagrams/objects to copy.

Then right click, select Convert-> To Polygon

Then copy to clipboard.

From Impress, paste from clipboards.

Thursday, March 27, 2014

Monday, March 24, 2014

Install Java JDK on Windows using Non-Administrative User credentials

1. Download Java JDK e.g. jdk-7u55-windows-i586.exe
2. Extract downloaded .exe file using 7-zip
3. A tools.zip will be extracted and extract again using 7-zip
4. Open Command Prompt and locate the directory of the extracted file
5. From there executive the following command:
for /r %x in (*.pack) do .\bin\unpack200 -r "%x" "%~dx%~px%~nx.jar"
6. Copy whole directory and all subdir of the extracted files e.g. c:\JDK
7. Setup JAVA environment via either of the following:
  • Right click My Computer -> Properties -> Advanced System settings -> Advanced -> Environment Variables. Add JAVA_HOME = c:\JDK. Add to Path = %JAVA_HOME%\bin
  • Create .bat file with following contents and execute when needed:
    • JAVA_HOME=C:\JDK
    • PATH=%PATH%;%JAVA_HOME%\bin

Sunday, March 23, 2014

Android Recovery Booting.. looping problem


1) Remove battery, wait for 30 seconds
2) Enable Download mode by pressing and holding Volume Down+Power+Home buttons and put battery in
3) When handset goes into Download mode, press Volume Down to cancel

Friday, March 21, 2014

Install CyanogenMod 11 ROM (Unofficial) Temasek kernel on Samsung GALAXY Note 3 (SM-N9005) Android KitKat 4.4.2

Device:
Samsung GALAXY Note 3
Rooted Android KitKat 4.4.2
SM-N9005

Files:
1. cm-11-20140320-UNOFFICIAL-temasek-hlte-V56.zip, for updates go to CyanogenMod 11 (Unofficial)Temasek kernel
2. gapps-kk-20140105-signed.zip, for updates go to CyanogenMod Google_Apps

Instructions:
- Make sure handset is rooted and battery is at least 80% charged
- Make sure USB Debugging is enabled from the Developer option of the handset
- Make sure ClockWorkMod Recovery 6.0.4.7 is installed
- Copy the two files (as is, not extracted) to the root folder of the handset's SD card.
- Turn off handset , by pressing power button and turn-off- Put the handset in Recovery mode by holding VolumeUp+Home+Power to boot.. Then confirm by selecting Continue using the Volume button and press Power to confirm selection
- In CWM, Perform Wipe data/factory reset. To do so, tap on Wipe and scroll down to Swipe on "Yes - Wipe all user data" option. Data wipe complete.

- Then perform a wipe cache partition scroll  and do a swipe on "Yes - Wipe Cache" option. Cache wipe complete
- Goto advanced
- Select Wipe dalvik cache, select "Yes - Wipe Dalvik Cache" option to continue. Dalvik Cache wiped.
- Select Go Back
- Select Install zip, then select"choose zip from /storage/extSdCard" where your ROM is copied.
- Select the ROM cm-11-20140320-UNOFFICIAL-temasek-hlte-V56.zip file you copied earlier to your handset's SD card. Scroll to the bottom of screen and swipe on "Yes - Install cm-11-20140320-UNOFFICIAL-temasek-hlte-V56.zip" option to begin installing the firmware. Installing update.
- Repeat the previous step to flash Google Apps gapps-kk-20140105-signed.zip as well. GApps Installation Complete! Install from sdcard complete.
- Go Bck
- Once Google Apps is also installed, select reboot and then tap on "reboot system now" to reboot your phone. Your handset will restart longer
- Setup handset upon reboot

Saturday, January 25, 2014

Install ClockWorkMod Recovery 6.0.4.7 on Samsung GALAXY Note 3 SM-N9005 Android KitKat 4.4.2

Device:
Samsung GALAXY Note 3
Rooted Android KitKat 4.4.2
SM-N9005

Files:
1. n9005-cwm-recovery-6.0.4.7-kk(0125).tar, for updates go to CWM Based Recovery 6.0.4.7 at XDA forum
2. Odin v3.09

Instructions:
- Make sure handset is rooted and battery is at least 80% charged
- Make sure Reactivation Lock is off (Settings->General->Security)
- Make sure USB Debugging is enabled from the Developer option of the handset
- Download and extract/unzip the two files
- Disconnect handset from your computer if connected via USB.
- Turn off handset , by pressing power button and turn-off- Put the handset in Download mode by holding VolumeDown+Home+Power to boot.. Then confirm by selecting Continue using the Volume button and press Power to confirm selection
- Connect the handset to your computer via USB. Wait if drivers are being installed.
- Start Odin3 v3.09.exe as an Administrator
- In Odin, a message showing "Added!!" will appear.
- In Odin, Click the AP button, and select n9005-cwm-recovery-6.0.4.7-kk(0125).tar
- Make sure Auto Reboot and F. Reset Time are checked. While the Repartition is NOT checked
- Click the Start button
- Odin will start processing and wait for handset to boot.
- Once complete a PASS message and green message will appear from Odin.
- handset can be disconnected, handset is rooted.

Monday, January 13, 2014

Eclipse Error Build path entry is missing: .. JavaSE-1.7

Error :
Build path entry is missing: org.eclipse.jdt.launching.JRE_CONTAINER/org.eclipse.jdt.internal.debug.ui.launcher.StandardVMType/JavaSE-1.7

Open Eclipse->Preferences->Java->Installed JREs->Search..

Root Samsung GALAXY Note 3 (SM-N9005) Firmware 4.4.2 KitKat using CF-Auto-Root

Device:
Samsung GALAXY Note 3
Android KitKat 4.4.2
SM-N9005
Firmware N9005XXUENA4

Just a precaution:
1. Remove Phone Encryption
2. Remove SD Encryption
3. Backup needed files e.g. pictures, etc
4. Remove lock screen password

Files:
1. CF-Auto-Root-hlte-hltexx-smn9005.zip, for updates go to CF-Auto-Root site
2. Odin v3.09

Instructions:
- Make sure USB Debugging is enabled from the Developer option of the handset
- Download and extract/unzip the two files
- Disconnect handset from your computer if connected via USB.
- Start Odin3 v3.09.exe as an Administrator
- Turn off handset , by pressing power button and turn-off
- Put the handset in Download mode by holding VolumeDown+Home+Power to boot.. Then confirm by selecting Continue using the Volume button and press Power to confirm selection
- Connect the handset to your computer via USB. Wait if drivers are being installed. A message showing "Added!!" will appear.
- In Odin, Click the AP button, and select CF-Auto-Root-hlte-hltexx-smn9005.tar.md5
- Make sure Auto Reboot and F. Reset Time are checked. While the Repartition is NOT checked
- Click the Start button
- Odin will start processing and wait for handset to boot. Once complete a PASS message and green message will appear from Odin.
- handset can be disconnected, handset is rooted.

Tuesday, January 7, 2014