Showing posts with label Linux. Show all posts

Wednesday, February 1, 2017

FAT-fs (/dev/sda1): Volume was not properly unmounted. Some data may be corrupt. Please run fsck.

# Install utility for making and checking MS-DOS FAT filesystems.
sudo apt-get install dosfstools

# Execute the following
sudo fsck.vfat -v -a -w /dev/sda1

dosfsck 3.0.13 (30 Jun 2012)
dosfsck 3.0.13, 30 Jun 2012, FAT32, LFN
Checking we can access the last sector of the filesystem
0x41: Dirty bit is set. Fs was not properly unmounted and some data may be corrupt.
 Automaticaly removing dirty bit.
There are differences between boot sector and its backup.
Differences: (offset:original/backup)
  71:53/2d, 72:50/33, 73:49/32, 74:4b/47, 75:45/42, 76:53/20, 77:2d/20
  , 78:33/20, 79:32/20, 80:47/20, 81:42/20
  Not automatically fixing this.
Boot sector contents:
System ID "BSD  4.4"
Media byte 0xf8 (hard disk)
       512 bytes per logical sector
     16384 bytes per cluster
        32 reserved sectors
First FAT starts at byte 16384 (sector 32)
         2 FATs, 32 bit entries
   7590400 bytes per FAT (= 14825 sectors)
Root directory start at cluster 2 (arbitrary size)
Data area starts at byte 15197184 (sector 29682)
   1897568 data clusters (31089754112 bytes)
32 sectors/track, 255 heads
         2 hidden sectors
  60751870 sectors total
/SHARES/02-20170802072122.avi
  File size is 1293488 bytes, cluster chain length is 655360 bytes.
  Truncating file to 655360 bytes.
Reclaiming unconnected clusters.
Checking free cluster summary.
Free cluster summary wrong (1888494 vs. really 1888533)
  Auto-correcting.
Performing changes.
/dev/sda1: 137 files, 9035/1897568 clusters


Wednesday, October 5, 2016

Install Kodi (Official Repository) on Raspberry Pi 3

After Raspbian Installation.

#Update Debian
sudo apt-get update
sudo apt-get upgrade

# Setup Wireless
# Edit Network interfaces
sudo vi /etc/network/interfaces

#add the following to the end of the interfaces file
auto wlan0
iface default inet dhcp

#Modify the following from the interfaces file
iface wlan0 inet dhcp 

# Edit wireless configuration
sudo vi /etc/wpa_supplicant/wpa_supplicant.conf

# Add the following:

network={
ssid="xxxx"
psk="xxxx"
}


# Install Kodi
sudo apt-get install kodi

# Allow Keyboard/Mouse from Kodi
sudo usermod -a -G input kodi

# Enable Kodi during startup
sudo vi /etc/default/kodi

# Edit the following config to enable Kodi during startup
# Set this to 1 to enable startup
ENABLED=1


#if you plan using more than 2TB external usb for your media, install NTFS-3G driver
sudo apt-get install ntfs-3g

# List UUIDs of connected drives
$ls -l /dev/disk/by-uuid
total 0
lrwxrwxrwx 1 root root 15 Oct  5 06:48 3698ef8e-f24cf61dfg1e -> ../../mmcblk0p2
lrwxrwxrwx 1 root root 10 Oct  5 06:48 55D8D96AD8D94ABC -> ../../sda1
lrwxrwxrwx 1 root root 15 Oct  5 06:48 70D7-EA1E -> ../../mmcblk0p1


# take note of the UUID (highlighted) and types of files supported
$sudo blkid
/dev/mmcblk0: PTUUID="3386e05a" PTTYPE="dos"
/dev/mmcblk0p1: SEC_TYPE="msdos" LABEL="boot" UUID="
70D7-EA1E" TYPE="vfat" PARTUUID="3487e05a-01"
/dev/mmcblk0p2: UUID="
3698ef8e-f24cf61dfg1e" TYPE="ext4" PARTUUID="3487e05a-02"
/dev/sda1: LABEL="spikes-3tb-movies" UUID="55D8D96AD8D94ABC" TYPE="ntfs"


# Create a mount folder
$sudo mkdir /media/spikes-3tb-movies

# Backup file system table file
$sudo cp /etc/fstab /etc/fstab.bak

# Edit file system table file
$sudo vi /etc/fstab
# Add the following to the file system table entries (replace those highlighted)
UUID=55D8D96AD8D94ABC /media/spikes-3tb-movies ntfs nofail,noatime,auto,users,rw,uid=1000,gid=100,umask=0002 0 0


Thursday, June 25, 2015

Preserving Timestamps when copying via Linux

#SCP

scp -pr folder_to_copy/ user_name@server_host:/destination_folder/
 
 
#CP
 
cp -p source destination 

Wednesday, September 3, 2014

Install PHP Profiler XHProf on Debian

# Install Prerequisites
apt-get install php5-dev graphviz php-pear

# Install XHProf
pecl config-set preferred_state beta
pecl install xhprof

# Create XHProf output directory
mkdir /tmp/xhprof
chown www-data:www-data /tmp/xhprof

# Include XHProf Alias in /etc/apache2/sites-available/default

Alias /xhprof_html /usr/share/php/xhprof_html/

   Options FollowSymLinks
   AllowOverride Alll
   Order allow, deny
   Allow from all


# Create PHP page for initializing XHProf e.g. vi /var/www/xhprof_header.php

// Init XHPROF
if (extension_loaded('xhprof')) {
    xhprof_enable(XHPROF_FLAGS_CPU + XHPROF_FLAGS_MEMORY);
    $XHPROF_ROOT = '/usr/share/php';
    include_once $XHPROF_ROOT . "/xhprof_lib/utils/xhprof_lib.php";
    include_once $XHPROF_ROOT . "/xhprof_lib/utils/xhprof_runs.php";
}

$i = 0;
while ($i < 10000) {
    $i++;
}
?>
 
# Create PHP page for de-initializing XHProf e.g. vi /var/www/xhprof_footer.php
// De-Init XHPROF, generate report and link
if (extension_loaded('xhprof')) {
    $data = xhprof_disable();
    $xhprof_runs = new XHProfRuns_Default();
    $run_id = $xhprof_runs->save_run($data, "xhprof");
    $profiler_url = sprintf('http:///xhprof_html/index.php?run=%s', $run_id);
    echo 'Profiler output';
}
?> 

# Configure XHProf via /etc/php5/apache2/php.ini
# Prepend/Append XHProf initializer/deinitializer page

[xhprof]
extension=xhprof.so
xhprof.output_dir="/tmp/xhprof"

auto_prepend_file=/var/www/xhprof_header.php
auto_append_file=/var/www/xhprof_footer.php


# Restart Apache2
service apache2 restart

Sunday, May 25, 2014

Command-line method to Compute / Generate MD5 Hash for a file

Windows
FCIV -md5 file_name

 Linux
 md5sum file_name

OS X
md5 file_name
openssl md5 file_name

Wednesday, May 21, 2014

Dual-boot Install Linux Ubuntu 14.04 LTS (Trusty Tahr) on MacBook 5,1 Aluminum Late 2008

Tested on MacBook 13-inch, Aluminum, Late 2008 on Maverick OS X and latest Ubuntu 14.04 (Trusty Tahr) LTS AMD64 + Mac Installer
NOTE:  If FileVault is enabled, turn off encryption before following the procedures below via System Preferences, Security & Privacy, Turn Off FileVault.
 
Download Ubuntu 14.04 LTS (Trusty Tahr) that support BIOS booting (+Mac version)
http://cdimage.ubuntu.com/releases/14.04/release/ubuntu-14.04-desktop-amd64+mac.iso
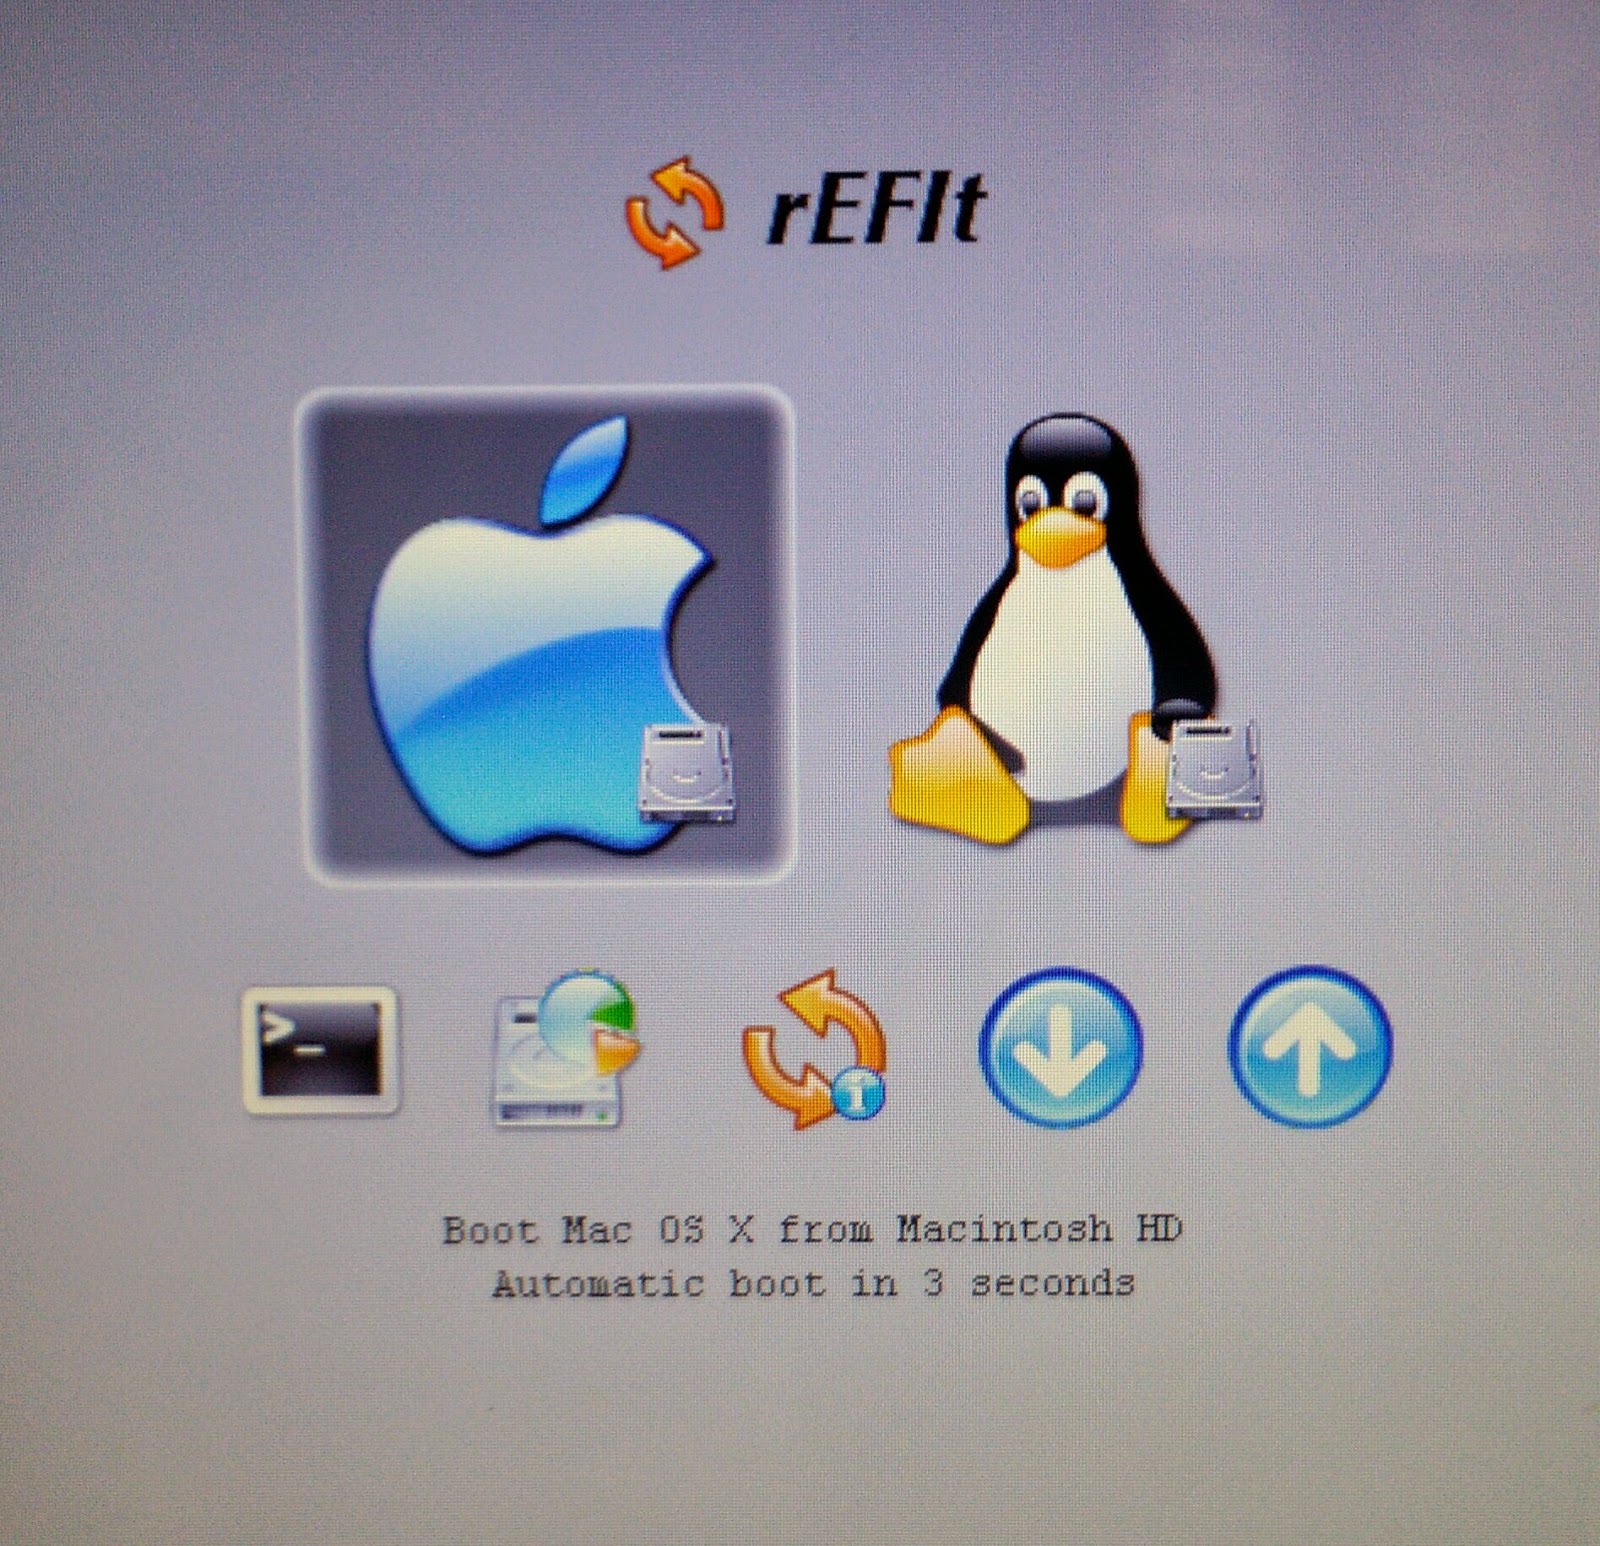
 
Download rEFIt - EFI Boot Menu and Toolkit
Website: http://refit.sourceforge.net/
Download: http://downloads.sourceforge.net/refit/rEFIt-0.14.dmg

Install rEFIt
1. Locate the downloaded file
2. Double-click the rEFIt-0.14.dmg file
3. Once extracted, install rEFIt by executing the rEFIt-0.14.mpkg file.
4. Restart machine
(rEFIt menu doesn't show up after boot, restart again and screen should show up after two reboots)
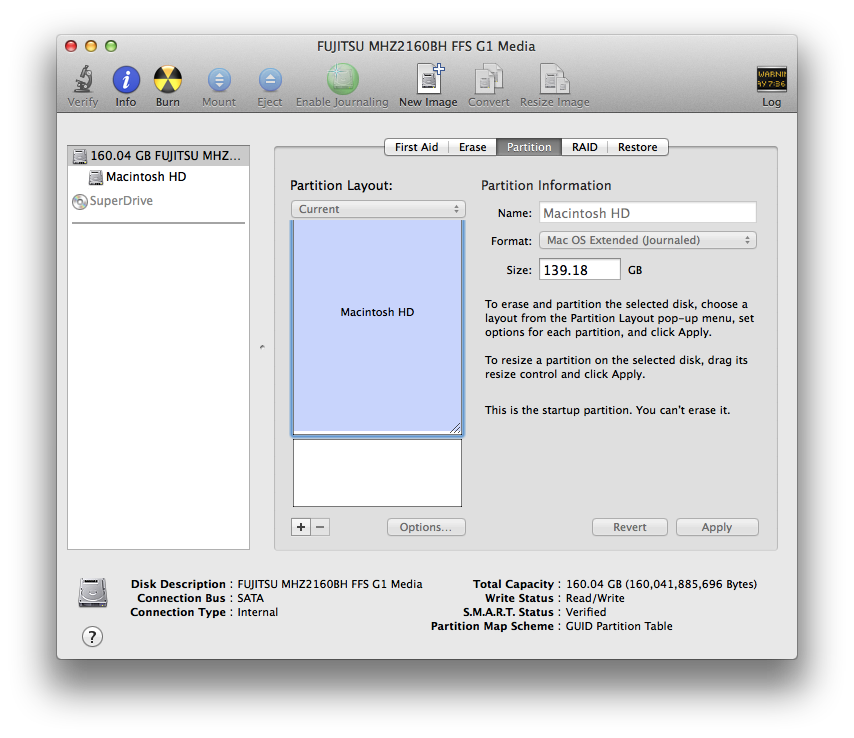

 
Using Disk Utility, add a new blank partition to be used by Ubuntu
1. Open Disk Utility
2. Select the Drive from the left-pane (e.g. 160.04 GB FUJITSU).
3. Click the Partition tab
4. In the Partition Layout click the + sign to add a new partition
5. Choose Free Space as Format
6. Modify Size for the new partition (e.g. 20 GB)
7. Click Apply, wait till finish.


Create Bootable Installer
A. Burn iso file to DVD
1. Insert blank DVD
2. Open Disk Utility
3. Drag the ubuntu-14.04-desktop-amd64+mac.iso file to left pane of Disk Utility
4. Right click the iso file then select Burn, make sure "Verify burned data" is checked
5. Click Burn.

B. Via Bootable USB
Convert downloaded Ubuntu iso to img
1. Open Terminal
2. Issue the following commands
hdiutil convert -format UDRW -o ubuntu-14.04-desktop-amd64+mac.img ubuntu-14.04-desktop-amd64+mac.iso

diskutil list  (take note of the device number e.g. /dev/disk2)

diskutil unmountDisk /dev/diskN
(replace N with the disk number from the last command)

sudo dd if=ubuntu-14.04-desktop-amd64+mac.img of=/dev/rdiskN bs=1m (replace N with the disk number from the last command)

Run diskutil eject /dev/diskN
(replace N with the disk number from the last command)

Install Ubuntu
1. Insert bootable Ubuntu Installer
2. Reboot and press letter c while booting
3. During installation, select Install Ubuntu alongside Mac OSX
(if network/internet error occurs during installation just proceed without internet connection)
Follow/continue installation
4. After installation, restart and rEFIt shows up select the Linux option

OTHERS: Install proprietary Broadcom drivers
1. Insert Ubuntu Installer

2. From Terminal, locate cd-rom where its mounted and change directory
(e.g. /media/Username/Ubuntu 14.04 LTS amd64)

3. Locate the b43 folder e.g.
cd /media/Username/Ubuntu 14.04 LTS amd64/pool/main/b/b43-fwcutter/

4. Install the b43 setup/installer
sudo dpkg -i b43-fwcutter*

5. From computer with internet access download the required firmware file copy to the MacBook either via USB
http://www.lwfinger.com/b43-firmware/broadcom-wl-5.100.138.tar.bz2

6. Extract firmware
tar xfvj broadcom-wl-5.100.138.tar.bz2

7. Install firmware
sudo b43-fwcutter -w /lib/firmware broadcom-wl-5.100.138/linux/wl_apsta.o

8. Restart
 
Ubuntu 14.04 LTS Home Screen


Tuesday, December 10, 2013

Sunday, May 5, 2013

Installing Oracle Java binaries on Debian Linux

#Check Linux version
uname -a

#Download appropriate binaries from Oracle site
#http://www.oracle.com/technetwork/java/javase/downloads/index.html
#Choose Linux x64 e.g. jdk-6u45-linux-x64.bin

#Remove java
sudo apt-get purge openjdk-\*
sudo apt-get remove --purge sun-java6-jdk

#Create java dir
sudo mkdir -p /usr/local/java

#Copy java to the newly created java dir
chmod a+x jdk-XuYY-linux-x64.bin

#extract
./jdk1.6.0_45-linux-x64.bin


#include java in system environment
vi /etc/profile
JAVA_HOME=/usr/local/java/jdk1.6.0_45
PATH=$PATH:$HOME/bin:$JAVA_HOME/bin
export JAVA_HOME
export PATH

#
update-alternatives --install "/usr/bin/java" "java" "/usr/local/java/jdk1.6.0_45/bin/java" 1
update-alternatives --install "/usr/bin/javac" "javac" "/usr/local/java/jdk1.6.0_45/bin/javac" 1

#reload environment
./etc/profile

#Check version
java -version
javac -version

Saturday, May 4, 2013

Install Cassandra on Debian Linux

#Install Debian

#Install Java

#Install JNA
apt-get install libjna-java

#Install Cassandra
sh -c 'echo deb http://www.apache.org/dist/cassandra/debian 12x main >> /etc/apt/sources.list.d/cassandra-stable.list'
sh -c 'echo deb-src http://www.apache.org/dist/cassandra/debian 12x main >> /etc/apt/sources.list.d/cassandra-stable.list'


#Add GPG Keys
gpg --keyserver pgp.mit.edu --recv-keys 4BD736A82B5C1B00
gpg --export --armor 4BD736A82B5C1B00 | sudo apt-key add -
gpg --keyserver pgp.mit.edu --recv-keys 2B5C1B00
gpg --export --armor 2B5C1B00 | sudo apt-key add -

sudo apt-get update
sudo apt-get install cassandra

#Configure Cassandra
/etc/cassandra

#Configure defaults
/etc/default/cassandra

#configure node 1
listen_address:  ip-address-of-node-1
rpc_address:  ip-address-of-node-1
seeds: ip-address-of-node-1

#configure node 2
listen_address:  ip-address-of-node-2
rpc_address:  ip-address-of-node-2
seeds: ip-address-of-node-1

#=====
setup
#create keyspace
 create keyspace MyKeyspace1 with placement_strategy = 'org.apache.cassandra.locator.SimpleStrategy' and strategy_options = {replication_factor:1};

#use keyspace
use MyKeyspace1;

#describe keyspace
describe MyKeyspace1;

Friday, March 25, 2011

Debian / Ubuntu Offline Update

On Online Machine (A):
Copy the /var/cache/apt/archives/ and /var/lib/apt/lists/ directories to the transfer drive (e.g. USB Flash drive).
Also get /etc/apt/sources.list and /etc/apt/sources.list.d/

On Offline Machine (B):
Copy files from the transfer drive to the same location on the Offline Machine.
Force APT to read the source files via 'sudo apt-cache gencaches'. This will allow APT to read the /var/lib/apt/lists/ and know what packages are available.


Now you can 'sudo apt-get install ' to install the available packages.

Sunday, March 6, 2011

ionCube MAMP / XAMP / Ubuntu Linux 10

For MAMP on MacOS 10.6.6:

Copy ioncube_loader_dar_5.3.so to /Applications/MAMP/bin/php5.3/lib/php/extensions/no-debug-non-zts-20090626/

File->Edit Template->PHP 5.3 ini
put zend_extension=/Applications/MAMP/bin/php5.3/lib/php/extensions/no-debug-non-zts-20090626/ioncube_loader_dar_5.3.so to the end of ini file.

Stop/Start MAMP


For XAMP on Windows :

Copy ioncube_loader_win_5.3.dll to c:/windows/system32

Edit c:/xampp/php/php.ini
put zend_extension=c:/windows/system32/ioncube_loader_win_5.3.dll

For PHP on Ubuntu Linux:

Copy ioncube_loader_lin_5.3.so to /usr/lib/php5/20090626+lfs/

Edit /etc/php5/apache2/php.ini
put zend_extension=/usr/lib/php5/20090626+lfs/ioncube_loader_lin_5.3.so