# raspistill -v
raspistill Camera App v1.3.8
Width 2592, Height 1944, quality 85, filename (null)
Time delay 5000, Raw no
Thumbnail enabled Yes, width 64, height 48, quality 35
Link to latest frame enabled no
Full resolution preview No
Capture method : Single capture
Preview Yes, Full screen Yes
Preview window 0,0,1024,768
Opacity 255
Sharpness 0, Contrast 0, Brightness 50
Saturation 0, ISO 0, Video Stabilisation No, Exposure compensation 0
Exposure Mode 'auto', AWB Mode 'auto', Image Effect 'none'
Metering Mode 'average', Colour Effect Enabled No with U = 128, V = 128
Rotation 0, hflip No, vflip No
ROI x 0.000000, y 0.000000, w 1.000000 h 1.000000
mmal: mmal_vc_component_create: failed to create component 'vc.ril.camera' (1:ENOMEM)
mmal: mmal_component_create_core: could not create component 'vc.ril.camera' (1)
mmal: Failed to create camera component
mmal: main: Failed to create camera component
mmal: Camera is not detected. Please check carefully the camera module is installed correctly
# Option 1
# Make sure 15pin Flexi Flat Cable (FFC) is correctly plug into the CSI port of Raspberry
# Blue tape should be facing the USB/Ethernet Ports
# Silver-side of the tape should be facing the HDMI port (or away from from the USB/Ethernet Ports)
# Option 2
# Try re seat the micro-connector from the camera module (the yellow cable connector with label P5V04A SUNNY) to the camera board PCB by pressing it against the board.
# raspistill -v
raspistill Camera App v1.3.8
Width 2592, Height 1944, quality 85, filename (null)
Time delay 5000, Raw no
Thumbnail enabled Yes, width 64, height 48, quality 35
Link to latest frame enabled no
Full resolution preview No
Capture method : Single capture
Preview Yes, Full screen Yes
Preview window 0,0,1024,768
Opacity 255
Sharpness 0, Contrast 0, Brightness 50
Saturation 0, ISO 0, Video Stabilisation No, Exposure compensation 0
Exposure Mode 'auto', AWB Mode 'auto', Image Effect 'none'
Metering Mode 'average', Colour Effect Enabled No with U = 128, V = 128
Rotation 0, hflip No, vflip No
ROI x 0.000000, y 0.000000, w 1.000000 h 1.000000
Camera component done
Encoder component done
Starting component connection stage
Connecting camera preview port to video render.
Connecting camera stills port to encoder input port
Closing down
Close down completed, all components disconnected, disabled and destroyed
Thursday, June 25, 2015

Preserving Timestamps when copying via Linux
#SCP
scp -pr folder_to_copy/ user_name@server_host:/destination_folder/ #CP cp -p source destination Setup Raspberry Pi Camera Module as Motion camera
# Install Motion
# Install video libraries and codec (usually libjpeg62 will fetch dependent drivers)
sudo chmod 664 /etc/motion.conf
sudo chmod 755 /usr/bin/motion
sudo touch /tmp/motion.log
sudo chmod 775 /tmp/motion.log
sudo mkdir -p /usr/local/motion-mmal/data
sudo chgrp -R motion /usr/local/motion-mmal
sudo chmod -R g+w /usr/local/motion-mmal/
# Edit /etc/motion.conf
# Edit /etc/motion.conf according to your preference
# Start motion
# Example commands
# STORE IMAGES/VIDEOS ON A SEPARATE DRIVE e.g. USB Drive
# Create folder for temporary storage of motion files
#CLEANUP MEDIA DRIVE, daily (optional)
find /media/USBFlash1/shares/* -mtime +1 -exec rm -f {} \;
sudo apt-get install motion
# Install video libraries and codec (usually libjpeg62 will fetch dependent drivers)
sudo apt-get install libjpeg62# Install custom motion-mmal driver. Get latest motion-mmal driver
cd /tmp
wget https://www.dropbox.com/s/jw5r1wss32tdibb/motion-mmal-opt.tar.gz
tar zxvf motion-mmal.tar.gz
cd motion-mmal
sudo cp /usr/bin/motion /usr/bin/motion.orig
sudo mv motion /usr/bin/motion
sudo mv motion-mmalcam.conf /etc/motion.conf
# Set permissions
sudo chmod 664 /etc/motion.conf
sudo chmod 755 /usr/bin/motion
sudo touch /tmp/motion.log
sudo chmod 775 /tmp/motion.log
sudo mkdir -p /usr/local/motion-mmal/data
sudo chgrp -R motion /usr/local/motion-mmal
sudo chmod -R g+w /usr/local/motion-mmal/
# Edit /etc/default/motion
start_motion_daemon=yes
# Edit /etc/motion.conf
daemon on
logfile /tmp/motion.log
# Edit /etc/motion.conf according to your preference
# Ensure compatibility with Windows Media Player / VLC
ffmpeg_video_codec msmpeg4
max_movie_time 180 #3 mins
movie_filename %d-%m-%Y-%H-%M
width 640
height 480
target_dir /home/pi/m-video
output_pictures off
text_left Pi %t
stream_maxrate 100
framerate 100
# Capture 2 frames before/after motion detection
pre_capture 2
post_capture 2
# Date formats
text_right %d-%m-%Y\n%T-%q
text_event %d%m%Y%H%M%S
snapshot_filename %v-%d%m%Y%H%M%S-snapshot
picture_filename %v-%d%m%Y%H%M%S-%q
movie_filename %v-%d%m%Y%H%M%S
# Allow view stream from other machine
stream_locahost off
# Start motion
sudo service motion start
# Example commands
for effect in none negative solarise sketch denoise emboss oilpaint hatch gpen pastel watercolour film blur saturation colourswap washedout posterise colourpoint colourbalance cartoon
    do
        echo $effect
        raspivid -d -ifx$effect
    done
# Testing camera
#!/usr/bin/env pythonimporttimeimportRPi.GPIO as GPIOGPIO.setmode(GPIO.BCM)# Set GPIO for camera LED# Use 5 for Model A/B and 32 for Model B+CAMLED =5# Set GPIO to outputGPIO.setup(CAMLED, GPIO.OUT, initial=False) # Five iterations with half a second# between on and offfor i in range(5): GPIO.output(CAMLED,True) # On time.sleep(0.5) GPIO.output(CAMLED,False) # Off time.sleep(0.5)# STORE IMAGES/VIDEOS ON A SEPARATE DRIVE e.g. USB Drive
# Create folder for temporary storage of motion files
sudo mkdir /mnt/motion_tmpfs
# Install NTFS driver, if external drive is NTFS-formatted (optional)
sudo apt-get install ntfs-3g # Create folder for USB Drive sudo mkdir /media/USBFlash1sudo mkdir /media/USBFlash1/shares # Install samba for windows file sharing (optional)sudo apt-get install samba samba-common-bin # Configure samba edit /etc/samba/smb.conf sudo cp /etc/samba/smb.conf /etc/samba/smb.conf.orig sudo vi /etc/samba/smb.conf security = user # uncomment this line # Add this to smb.conf [motion]
comment = Backup Folder
path = /media/USBFlash1/shares
valid users = @users
force group = users
create mask = 0660
directory mask = 0771
read only = no # Add permissionssudo useradd backups -m -G userssudo passwd backupssudo smbpasswd -a backups # Add to /etc/fstab (if /dev/sda1 is the drive), estimate 10MB per 3 seconds of video
tmpfs /mnt/motion_tmpfs tmpfs defaults,nosuid,size=80M,mode=0777 0 0
/dev/sda1 /media/USBFlash1 auto user,umask=0000 0 0 # Create copy script from temporary folder to usb drive for files older than 5.05 mins
sudo nano /opt/tmpfsToUSBFlash.sh
#! /bin/sh

while :
do
        find /mnt/motion_tmpfs -type f -mmin +5.05 -exec mv "{}" /media/USBFlash1/ \;
        sleep 2
done
# Create boot scripts
sudo nano /etc/init.d/tmpfsToUSBFlash
 #! /bin/sh
# /etc/init.d/tmpfsToUSBFlash

### BEGIN INIT INFO
# Provides:          Copies images from the motion tmpfs to a USB Drive
# Required-Start:    $remote_fs $syslog
# Required-Stop:     $remote_fs $syslog
# Default-Start:     2 3 4 5
# Default-Stop:      0 1 6
# Short-Description: Simple script to start a program at boot
# Description:       Copies images from the motion tmpfs to a USB Drive
### END INIT INFO

# Carry out specific functions when asked to by the system
case "$1" in
  start)
    echo "Starting copy tmpfs to USB Drive"
    sh /opt/tmpfsToUSBFlash.sh 2>&1 &;
    ;;
  stop)
    echo "Stopping copy tmpfs to serv"
    tmpfsPID=`ps auxwww | grep tmpfsToUSBFlash.sh | head -1 | awk '{print $2}'`
    kill -9 $tmpfsPID
    ;;
  *)
    echo "Usage: /etc/init.d/tmpfsToUSBFlash {start|stop}"
    exit 1
    ;;
esac

exit 0
# Make it executable
sudo chmod 755 /etc/init.d/tmpfsToUSBFlash
# Update rc scripts
sudo update-rc.d tmpfsToUSBFlash defaults
# edit /etc/motion.conf
# change target_dir to point to temporary folder
target_dir /mnt/motion_tmpfs
find /media/USBFlash1/shares/* -mtime +1 -exec rm -f {} \;
Monday, June 22, 2015
Setup WaveShare SpotPear 3.2" TFT LCD on Raspberry Pi 2
 Setup WaveShare SpotPear display on Raspberry Pi 2
 Components used for this setup:
1. Raspberry Pi 2 Model B
2.Raspbian
3. WaveShare SpotPear 3.2" TFT LCD
4. Edimax EW-7811Un 802.11b/g/n USB WiFi adapter
# Install Raspbian
# Change /dev/fb0 to /dev/fb1 in /usr/share/X11/xorg.conf.d/99-fbturbo.conf
Option “fbdev” “/dev/fb1″
# Update firmware from Notro
sudo REPO_URI=https://github.com/notro/rpi-firmware rpi-update
sudo reboot
# Enable SPI via raspi-config
sudo raspi-config
"Advanced Options" -> "SPI ENABLE/DISABLE AUTOMATIC LOADING"
# Add the following to /etc/modules (next line after snd-bcm2835)
spi-bcm2708
ads7846
fbtft_device name=waveshare32b gpios=dc:22,reset:27 speed=48000000
fb_ili9340 width=320 height=240 buswidth=8 init=-1,0xCB,0x39,0x2C,0x00,0x34,0x02,-1,0xCF,0x00,0XC1,0X30,-1,0xE8,0x85,0x00,0x78,-1,0xEA,0x00,0x00,-1,0xED,0x64,0x03,0X12,0X81,-1,0xF7,0x20,-1,0xC0,0x23,-1,0xC1,0x10,-1,0xC5,0x3e,0x28,-1,0xC7,0x86,-1,0x36,0x28,-1,0x3A,0x55,-1,0xB1,0x00,0x18,-1,0xB6,0x08,0x82,0x27,-1,0xF2,0x00,-1,0x26,0x01,-1,0xE0,0x0F,0x31,0x2B,0x0C,0x0E,0x08,0x4E,0xF1,0x37,0x07,0x10,0x03,0x0E,0x09,0x00,-1,0XE1,0x00,0x0E,0x14,0x03,0x11,0x07,0x31,0xC1,0x48,0x08,0x0F,0x0C,0x31,0x36,0x0F,-1,0x11,-2,120,-1,0x29,-1,0x2c,-3
# Add the following in /boot/cmdline.txt (append right after the rootwait )
fbtft_device.custom fbtft_device.name=waveshare32b fbtft_device.gpios=dc:22,reset:27 fbtft_device.bgr=1 fbtft_device.speed=48000000 fbcon=map:10 fbcon=font:ProFont6x11 logo.nologo dma.dmachans=0x7f35 console=tty1 consoleblank=0 fbtft_device.fps=50 fbtft_device.rotate=0
# Reboot
sudo reboot
# Activate Touch Screen via /boot/config.txt (insert before the end of file)
dtoverlay=ads7846,speed=500000,penirq=17
# (optional) Calibrate
sudo apt-get install xinput evtest libts-bin
sudo TSLIB_TSDEVICE=/dev/input/event0 TSLIB_FBDEVICE=/dev/fb1 ts_calibrate
# Reboot
sudo reboot
# Updating packages exceptbootlooder
sudo apt-mark hold raspberrypi-bootloader
sudo apt-get update
sudo apt-get upgrade
# Updating bootloader independently
sudo apt-get install rpi-update
sudo SKIP_KERNEL=1 rpi-update
# In cases custom driver was overwritten, restore update
sudo REPO_URI=https://github.com/notro/rpi-firmware BRANCH=builtin rpi-update
sudo reboot
Setup Wifi of Raspberry Pi via Command Line
# Include or update /etc/network/interfaces (usually those in bold below are to be included or updated in this file
auto wlan0allow-hotplug wlan0 iface wlan0 inet dhcp wpa-conf /etc/wpa_supplicant/wpa_supplicant.conf iface default inet dhcp
# Backup Wifi config
sudo cp/etc/wpa_supplicant/wpa_supplicant.conf/etc/wpa_supplicant/wpa_supplicant.conf.orig
# Include in the /etc/wpa_supplicant/wpa_supplicant.conf network={
ssid="YOUR_NETWORK_NAME"
psk="YOUR_NETWORK_PASSWORD"} Wednesday, May 27, 2015
Step by Step Install / Uninstall JDK 8 on OS X Yosemite
Step by Step Setup / Install of Java SE Development Kit 8 on OS X Yosemite
Download the Java SE Development Kit 8
Open Browser and proceed to Oracle's Java SE Downloads page

Click JDK DOWNLOAD button to goto the Java SE Development Kit 8 Downloads page
 You must accept the Oracle Binary Code License Agreement for Java SE to enable links for downloading the JDKs.
 Select the Accept License Agreement radio button and then will be prompted the message: Thank you for accepting the Oracle Binary Code License Agreement for Java SE; you may now download this software. You are now ready to download the binaries by clicking the corresponding Download link e.g. jdk-8u60-macosx-x64.dmg
Install Java SE Development Kit 8
Open the installer by double-clicking the downloaded Apple Disk Image file e.g jdk-8u60-macosx-x64.dmg

Double-click the pkg icon e.g. JDK 8 Update 60.pkg icon to start installation.
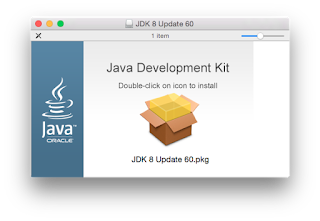
You will be prompted with Welcome to the JDK 8 Update Installer screen. Press the Continue button.

You will then be prompted with the start of the installation confirmation screen. Press Install button.

You will be prompted to enter administrator credentials in order to continue with the installation. Enter Password and press Install Software button to continue with the installation.

Follow installation instructions and press Close when

You will be prompted with the installation was completed successfully screen and press Close button to finish installation.

Once completed, set environment via ~/.bash_profile
$ export set JAVA_HOME=/Library/Java/JavaVirtualMachines/jdk1.8.0_60.jdk/Contents/Home
Verify Installed JDK
Verify installed JDK via java -version command.
Uninstall an existing JDK
List installed Java Virtual Machines via ls command
$ ls /Library/Java/JavaVirtualMachines
jdk1.8.0_51.jdk jdk1.8.0_60.jdk
To uninstall an existing JDK, issue rm -rf /Library/Java/JavaVirtualMachines/jdkmajor.minor.macro[_update].jdk command for a specific jdk e.g jdk1.8.0_51.jdk
Download the Java SE Development Kit 8
Open Browser and proceed to Oracle's Java SE Downloads page

Click JDK DOWNLOAD button to goto the Java SE Development Kit 8 Downloads page


Install Java SE Development Kit 8
Open the installer by double-clicking the downloaded Apple Disk Image file e.g jdk-8u60-macosx-x64.dmg

Double-click the pkg icon e.g. JDK 8 Update 60.pkg icon to start installation.

You will be prompted with Welcome to the JDK 8 Update Installer screen. Press the Continue button.

You will then be prompted with the start of the installation confirmation screen. Press Install button.

You will be prompted to enter administrator credentials in order to continue with the installation. Enter Password and press Install Software button to continue with the installation.

Follow installation instructions and press Close when

You will be prompted with the installation was completed successfully screen and press Close button to finish installation.

Once completed, set environment via ~/.bash_profile
$ export set JAVA_HOME=/Library/Java/JavaVirtualMachines/jdk1.8.0_60.jdk/Contents/Home
Verify Installed JDK
Verify installed JDK via java -version command.
$ java -version
java -version
java version "1.8.0_60"
Java(TM) SE Runtime Environment (build 1.8.0_60-b27)
Java HotSpot(TM) 64-Bit Server VM (build 25.60-b23, mixed mode)
Uninstall an existing JDK
List installed Java Virtual Machines via ls command
$ ls /Library/Java/JavaVirtualMachines
jdk1.8.0_51.jdk jdk1.8.0_60.jdk
To uninstall an existing JDK, issue rm -rf /Library/Java/JavaVirtualMachines/jdkmajor.minor.macro[_update].jdk command for a specific jdk e.g jdk1.8.0_51.jdk
$ sudo rm -rf /Library/Java/JavaVirtualMachines/jdk1.8.0_51.jdk
Password:*
Setup / Install Tomcat 8 on OS X Yosemite
#Download latest tomcat
#Create /usr/local
sudo mkdir -p /usr/local
#Goto directory to /usr/local
cd /usr/local
#Extract downloaded tomcat from the /usr/local
tar -zxvf ./apache-tomcat-8.0.45.tar.gz
sudo ln -s /usr/local/apache-tomcat-8.0.45 /Library/Tomcat
#Remove existing tomcat directory
sudo rm -f /Library/Tomcat
#Create symbolic link for easier access sudo chown -R/Library/Tomcat sudo chmod +x /Library/Tomcat/bin/*.sh
#configure gui admin for tomcat via /Library/Tomcat/conf/tomcat-users.xml include inside
#Start tomcat from terminal
/Library/Tomcat/bin/startup.sh
#Stop tomcat from terminal
/Library/Tomcat/bin/shutdown.sh
Subscribe to:
Posts (Atom)