Sunday, June 15, 2014

Friday, June 6, 2014
OS X: Partition or Resizing Error / Partition failed with the error: Couldn’t modify partition map because file system verification failed.
Shutdown
Start system into Single User Mode by holding Command+S during boot
At the command prompt, type:
/sbin/fsck -fy then ENTER
When fsck is complete, type “exit” to restart
Start system and verify disk using Disk Utility
Start system into Single User Mode by holding Command+S during boot
At the command prompt, type:
/sbin/fsck -fy then ENTER
When fsck is complete, type “exit” to restart
Start system and verify disk using Disk Utility
Wednesday, June 4, 2014
Uninstall OS X EnterpriseDB PostgreSQL 9.1
Open a terminal window via Applications->Utilities->Terminal
Open User & Groups via System Preferences -> Users & Groups and delete PostgreSQL user
open /Library/PostgreSQL/9.1/uninstall-postgresql.app
sudo rm -rf /Library/PostgreSQL sudo rm /etc/postgres-reg.iniOpen User & Groups via System Preferences -> Users & Groups and delete PostgreSQL user
Tuesday, May 27, 2014
OS X Open Terminal at current Folder shortcut
Open System Preferences -> Keyboard -> Shortcuts
Under Files and Folders, check New Terminal at Folder or New Terminal Tab at Folder

While at a folder, right-click, then Services, then New Terminal
Under Files and Folders, check New Terminal at Folder or New Terminal Tab at Folder
While at a folder, right-click, then Services, then New Terminal
Sunday, May 25, 2014
Wednesday, May 21, 2014
Dual-boot Install Linux Ubuntu 14.04 LTS (Trusty Tahr) on MacBook 5,1 Aluminum Late 2008
Tested on MacBook 13-inch, Aluminum, Late 2008 on Maverick OS X and latest Ubuntu 14.04 (Trusty Tahr) LTS AMD64 + Mac Installer
 NOTE: If FileVault is enabled, turn off encryption before following the procedures below via System Preferences, Security & Privacy, Turn Off FileVault.
Download Ubuntu 14.04 LTS (Trusty Tahr) that support BIOS booting (+Mac version)
http://cdimage.ubuntu.com/releases/14.04/release/ubuntu-14.04-desktop-amd64+mac.iso
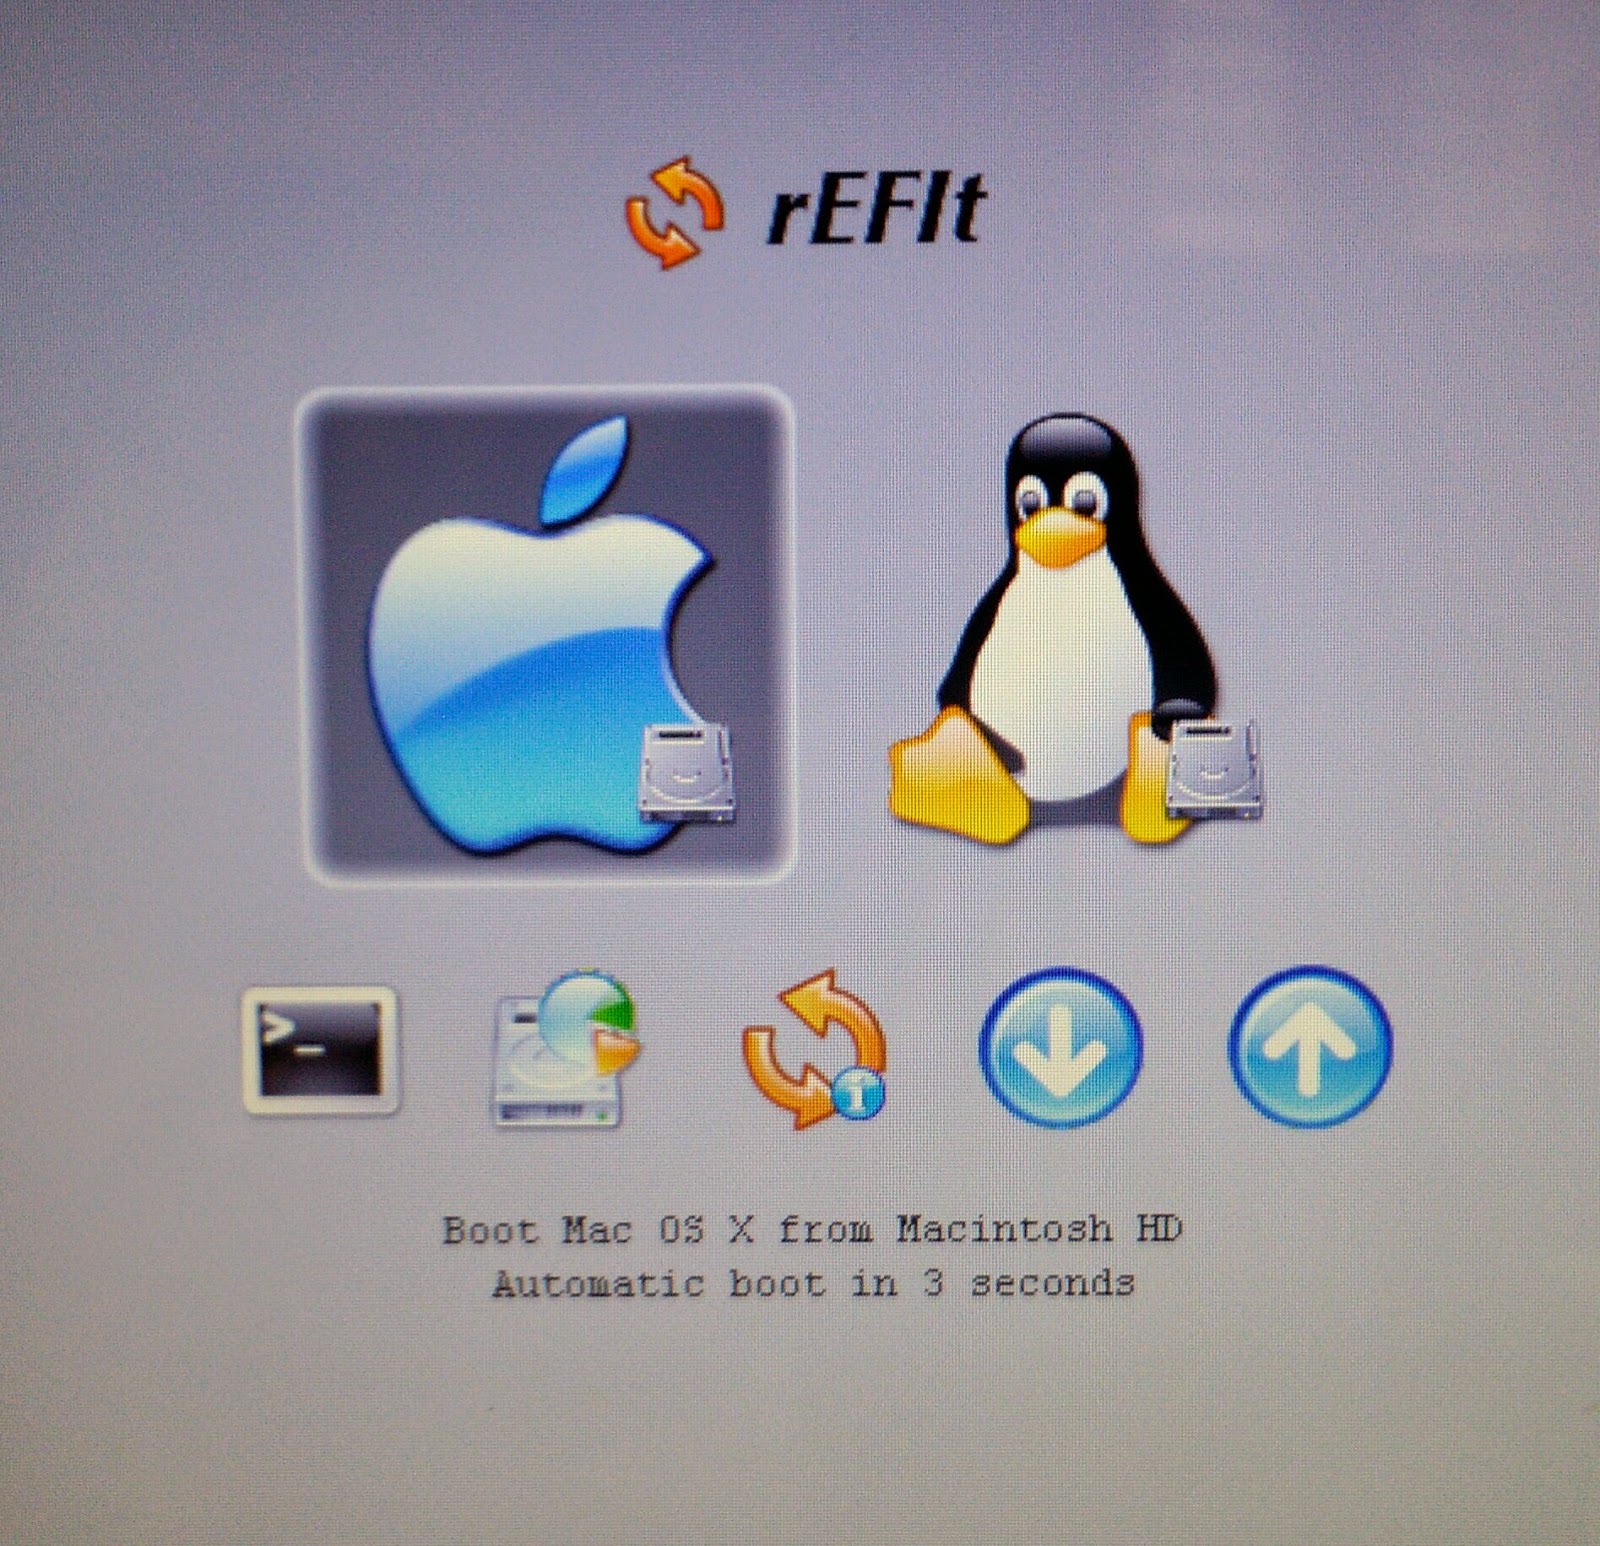
Download rEFIt - EFI Boot Menu and Toolkit
Website: http://refit.sourceforge.net/
Download: http://downloads.sourceforge.net/refit/rEFIt-0.14.dmg
Install rEFIt
1. Locate the downloaded file
2. Double-click the rEFIt-0.14.dmg file
3. Once extracted, install rEFIt by executing the rEFIt-0.14.mpkg file.
4. Restart machine
(rEFIt menu doesn't show up after boot, restart again and screen should show up after two reboots)
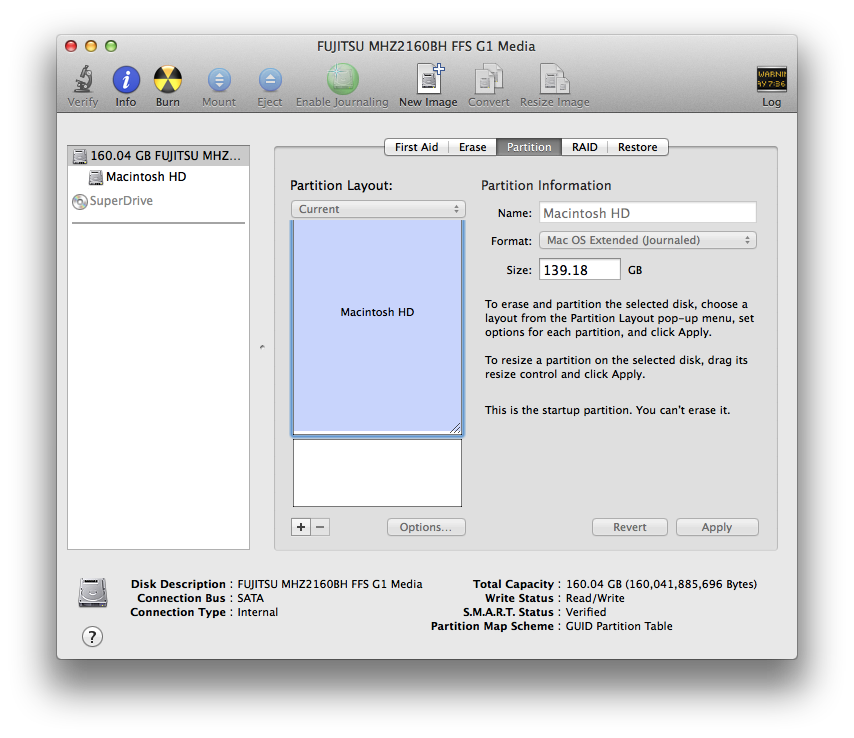
Using Disk Utility, add a new blank partition to be used by Ubuntu
1. Open Disk Utility
2. Select the Drive from the left-pane (e.g. 160.04 GB FUJITSU).
3. Click the Partition tab
4. In the Partition Layout click the + sign to add a new partition
5. Choose Free Space as Format
6. Modify Size for the new partition (e.g. 20 GB)
7. Click Apply, wait till finish.
Create Bootable Installer
A. Burn iso file to DVD
1. Insert blank DVD
2. Open Disk Utility
3. Drag the ubuntu-14.04-desktop-amd64+mac.iso file to left pane of Disk Utility
4. Right click the iso file then select Burn, make sure "Verify burned data" is checked
5. Click Burn.
B. Via Bootable USB
Convert downloaded Ubuntu iso to img
1. Open Terminal
2. Issue the following commands
Install Ubuntu
1. Insert bootable Ubuntu Installer
2. Reboot and press letter c while booting
3. During installation, select Install Ubuntu alongside Mac OSX
(if network/internet error occurs during installation just proceed without internet connection)
Follow/continue installation
4. After installation, restart and rEFIt shows up select the Linux option
OTHERS: Install proprietary Broadcom drivers
1. Insert Ubuntu Installer
2. From Terminal, locate cd-rom where its mounted and change directory
(e.g. /media/Username/Ubuntu 14.04 LTS amd64)
3. Locate the b43 folder e.g.
cd /media/Username/Ubuntu 14.04 LTS amd64/pool/main/b/b43-fwcutter/
4. Install the b43 setup/installer
sudo dpkg -i b43-fwcutter*
5. From computer with internet access download the required firmware file copy to the MacBook either via USB
http://www.lwfinger.com/b43-firmware/broadcom-wl-5.100.138.tar.bz2
6. Extract firmware
tar xfvj broadcom-wl-5.100.138.tar.bz2
7. Install firmware
sudo b43-fwcutter -w /lib/firmware broadcom-wl-5.100.138/linux/wl_apsta.o
8. Restart

NOTE: If FileVault is enabled, turn off encryption before following the procedures below via System Preferences, Security & Privacy, Turn Off FileVault.Download Ubuntu 14.04 LTS (Trusty Tahr) that support BIOS booting (+Mac version)
http://cdimage.ubuntu.com/releases/14.04/release/ubuntu-14.04-desktop-amd64+mac.iso
Download rEFIt - EFI Boot Menu and Toolkit
Website: http://refit.sourceforge.net/
Download: http://downloads.sourceforge.net/refit/rEFIt-0.14.dmg
Install rEFIt
1. Locate the downloaded file
2. Double-click the rEFIt-0.14.dmg file
3. Once extracted, install rEFIt by executing the rEFIt-0.14.mpkg file.
4. Restart machine
(rEFIt menu doesn't show up after boot, restart again and screen should show up after two reboots)
Using Disk Utility, add a new blank partition to be used by Ubuntu
1. Open Disk Utility
2. Select the Drive from the left-pane (e.g. 160.04 GB FUJITSU).
3. Click the Partition tab
4. In the Partition Layout click the + sign to add a new partition
5. Choose Free Space as Format
6. Modify Size for the new partition (e.g. 20 GB)
7. Click Apply, wait till finish.
Create Bootable Installer
A. Burn iso file to DVD
1. Insert blank DVD
2. Open Disk Utility
3. Drag the ubuntu-14.04-desktop-amd64+mac.iso file to left pane of Disk Utility
4. Right click the iso file then select Burn, make sure "Verify burned data" is checked
5. Click Burn.
B. Via Bootable USB
Convert downloaded Ubuntu iso to img
1. Open Terminal
2. Issue the following commands
hdiutil convert -format UDRW -o ubuntu-14.04-desktop-amd64+mac.img ubuntu-14.04-desktop-amd64+mac.iso
diskutil list (take note of the device number e.g. /dev/disk2)
diskutil unmountDisk /dev/diskN
(replace N with the disk number from the last command)
sudo dd if=ubuntu-14.04-desktop-amd64+mac.img of=/dev/rdiskN bs=1m (replace N with the disk number from the last command)
Run diskutil eject /dev/diskN
(replace N with the disk number from the last command)
Install Ubuntu
1. Insert bootable Ubuntu Installer
2. Reboot and press letter c while booting
3. During installation, select Install Ubuntu alongside Mac OSX
(if network/internet error occurs during installation just proceed without internet connection)
Follow/continue installation
4. After installation, restart and rEFIt shows up select the Linux option
OTHERS: Install proprietary Broadcom drivers
1. Insert Ubuntu Installer
2. From Terminal, locate cd-rom where its mounted and change directory
(e.g. /media/Username/Ubuntu 14.04 LTS amd64)
3. Locate the b43 folder e.g.
cd /media/Username/Ubuntu 14.04 LTS amd64/pool/main/b/b43-fwcutter/
4. Install the b43 setup/installer
sudo dpkg -i b43-fwcutter*
5. From computer with internet access download the required firmware file copy to the MacBook either via USB
http://www.lwfinger.com/b43-firmware/broadcom-wl-5.100.138.tar.bz2
6. Extract firmware
tar xfvj broadcom-wl-5.100.138.tar.bz2
7. Install firmware
sudo b43-fwcutter -w /lib/firmware broadcom-wl-5.100.138/linux/wl_apsta.o
8. Restart
Ubuntu 14.04 LTS Home Screen
Sunday, May 18, 2014
Application Blocked by Security Settings (OS X)
Error:
Application Blocked by Security Settings
Your security settings have blocked an untrusted application from running.
Solution
Apple Menu->System Preferences->Select the Java icon
Java control panel will open up in a separate window. -> Select the Security Tab->Change security level to Medium. -> Accept change with Ok
Application Blocked by Security Settings
Your security settings have blocked an untrusted application from running.
Solution
Apple Menu->System Preferences->Select the Java icon
Java control panel will open up in a separate window. -> Select the Security Tab->Change security level to Medium. -> Accept change with Ok
Subscribe to:
Posts (Atom)